
✅ Step 1: Check the "Prevent deleting tables" setting
Before removing the Lite version, make sure your existing tables and data are protected.
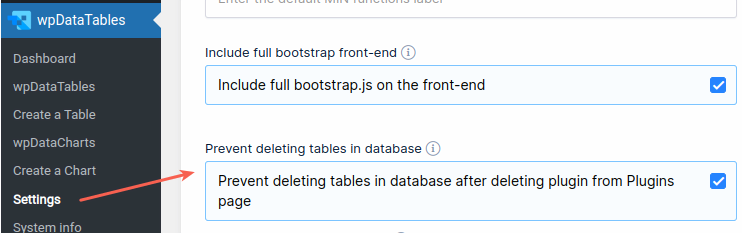
Go to wpDataTables → Settings.
Ensure the option “Prevent deleting tables in database” is enabled (checked).
This setting is enabled by default.
It ensures all tables, charts, and plugin settings you've created remain stored safely in your WordPress database.
⚠ If you disable this option, deleting the plugin will also delete all of your data.
🧹 Step 2: Remove wpDataTables Lite
To install the premium version, you must first delete the Lite(free) version:
Go to your WordPress Plugins section.
Deactivate the wpDataTables Lite plugin.
After the page refreshes, scroll to the plugin again and click Delete.
💾 Step 3: Download the Premium Version
Depending on where you purchased the plugin:
From the TMS store:
Log in using the credentials you received after purchase, and download the plugin installation file from your account.From CodeCanyon (Envato):
Download the plugin installation ZIP file from your Envato account’s Downloads page.
📥 Step 4: Install the Premium Plugin
In WordPress, go to Plugins → Add New.
Click Upload Plugin, then upload the ZIP file of the full version you downloaded.
Once uploaded, click Install Now, then Activate.
That’s it — your premium version is now installed and ready!
🛠 Optional: Activate Your License for Updates
To receive automatic plugin updates:
Copy your Purchase Code from your TMS Store or Envato profile.
Go to wpDataTables → Settings → Activation.
Paste the code and save.